GLUTEN FREE OATMEAL CHOCOLATE CHIP COOKIES

'Tis the season for cookie exchanges and holiday parties filled with desserts. Eating sweets is probably one the best parts of this time of year, but for those of you that have dietary restrictions that prevent you from enjoying the average cookie here is a SUPER tasty chocolate cookie recipe created by Nicole Lee of Hey Dear.

When I was nursing Levi I had to change my diet dramatically to accommodate his sensitive stomach, and that led me to reaching out to Nicole. Nicole is an amazing food stylist, photographer and cook who has had to learn to cook gluten-free to help her body feel its best. She has three littles at home, so you know that this recipe has been taste tested by the ultimate experts. 

We hope you enjoy these cookies all year!

GLUTEN-FREE & DAIRY FREE CHOCOLATE COOKIES

INGREDIENTS:

1-cup vegan butter – Earth balance soy free baking sticks
1-cup sugar – Raw Sugar, preferably organic
1-cup light brown organic sugar
1 teaspoon Vanilla
2 eggs
1 ¾ cups Gluten Free Flour – Bob’s red mill  one/one mix is great! 
1-teaspoon baking powder
1-teaspoon kosher salt
2 cups Gluten Free Thick rolled oats (bob’s redmill is the best!)
1 bag of vegan chocolate chips/ or favorite brand 

An electric mixer, measuring cups, ice cream scoop, parchment paper, and cookie
trays.

DIRECTIONS:

In an electric mixer cream the butter, sugars, and vanilla, add in one egg at a time. In a separate bowl mix the dry ingredients, minus the rolled oats and chocolate chips!  While the electric mixer is still going slowly add in the flour mixture and until dough forms. Then take off the bowl of the mixer grab a spatula, dump in the rolled oats and the chocolate chips. Hand mix until evenly through the dough. 

Now this part is key, you need to let the dough chill for at least one hour. If you have patience let it sit overnight. Instead of the dough being soupy it will bake perfectly.

Once the dough is chilled, preheat the oven to 355 degrees. Line your cookie sheet with parchment paper, then scoop with a small ice cream scoop your dough and place on the tray. You will make rows of three about 1 inch apart from each other on the tray. Bake for 9-12 min. Until golden brown on the edges.

Once done remove the cookies from the cookie tray and place on a cooling rack until cooled. Then serve with milk and enjoy!

POTATO & LEEK SOUP WITH SPICY SAUSAGE

The holidays are here, so that means entertaining season is here too. If you're planning on having a big party or small gathering you might want to consider serving soup, especially this potato and leek soup. This recipe is something you can make the day before or even earlier in the day and let it simmer on the stove while you enjoy your friends and family. What is also great about it is that it's gluten, dairy and nut free for those who have friends with food sensitivities. You can also modify the recipe to make it vegetarian or vegan, and it still  tastes great.

kitchen12blog.jpg

I hate it when you go to someone's house and you can't even converse with the host because they are too busy cooking. Haha! That's actually ME a lot of the time when I'm hosting because I'm not the best cook and it takes ALL of my concentration to do it. I'm really trying to be better at it, so I asked Nicole if she could help me.

Nicole Lee from Hey Dear came over to my house and gave me a private cooking lesson just in time for the holidays. It was exactly what I needed. I learned three different recipes, how to hold my knife correctly, how to chop my veggies the right way, and got some ideas of what to keep in my pantry. She is a brilliant cook and an amazing food stylist. If you're looking for some gluten free recipes be sure to check out her blog or hire her to help you become a better cook.

INGREDIENTS:

1 cup dry white wine, preferable sauvignon blanc
1 1/2 cups free range organic vegetable broth
2 celery stalks chopped
2 carrots chopped
2 sweet onions, chopped
1lb leek, the whole thing chopped
1-2 garlic cloves finely minced
1 lb fingerling potatoes (russet or yukon gold work great too)
1 tsp dried thyme
1 tsp dried oregano
Salt and pepper to taste
1 bay leaf
1 lb. Italian sausage, sweet or spicy (in casing)

DIRECTIONS:
Chop all of your vegatables with the carrots, onions and celery. Then peal the leeks, chop off the ends and slice them into quarters. Wash your potatoes and cop them into even cuts (in half, then half again, until they are in little squares). Put the carrots, celery, onion and leeks in a bowl, set aside. Put the chopped potatoes aside as well. Then finally chop the garlic and set aside.

Bring a frying pan to medium heat and sear the sausage for about minutes on each side. Once browned on each side, poke with a fork and reduce to low heat. Put a lid on the pan and finish cooking about 10-15 minutes until there is no pink the middle.

NOTE: Be mind that this is soup, it's rustic, it doesn't have to be perfect and really just throw it in the pot and it will do the rest.

Heat your soup pot to medium heat. Put in about a tablespoon of olive oil into the pan and add in the bowl of carrots, onion, celery and leeks. Mix together with a wooden spoon and let cook for about 5-10 minutes until the onions become translucent. Add a pinch of salt and pepper to taste. Also add your herbs. Add in your cup of white wine, keep the heat going so it reduced the alcohol properly. Let this cook together for about 8 minutes. Then add in your chicken broth, let it cook until you see it start boil.

While that finishes cooking, in another pot boil your potatoes until soft. Chop your sausage and then once both are finished add the sausage and potatoes to the soup mixture.

Let all of the ingredients simmer for about 20 minutes to an hour. If you have more time let it cool a bit longer. The longer it sits the better it will taste. Finally, add more salt and pepper to taste and serve with crusty bread and a dollop of fresh cream or fresh vegan yogurt. Enjoy!

SUBURBAN KITCHEN TRANSFORMATION

We always said we would never live in the suburbs. Well, never say never folks because we are rockin' the suburbs now. Maybe the minivan will come next because we also said we would never buy one of those too. We moved away from the city because Ryan was commuting an hour each way to work and we were craving way more family time. It was bittersweet to say good-bye to our cute 1950's ranch house and buy a home in a development where all of the architecture looks the same. Afterall, it was our first house, the place we brought Elle home to and we had put a ton of work into it.  

When we found our new home we knew it would need some work to update it, but the layout and bones were perfect. Ryan and I decided the first thing that we would going to do was repaint the whole house white, replace the flooring downstairs and upstairs and get new appliances. We wanted to start with a clean slate, and the first room to tackle was the kitchen.

As I am sure you know everyone congregates in the kitchen no matter how big or small. You cook three meals a day in there, and with little ones I'm always in there getting snacks too. This kitchen had the original appliances from the 1990's. They were functioning, but the oven seemed like it was going to fall over when you opened the door. We upgraded to stainless steel Kitchen Aid appliances. Though their original oven was electric we saw there was a gas line available, so we chose a gas stove. We are super happy with everything except the fridge. It feels a bit cheap when you open the freezer. 

We chose to pain the walls and cabinets West Highland White by Sherwin Williams. We LOVE this white. It's warm and bright and not too yellow at all. For the new floors we picked out a hand-scraped hickory that had a lot of color variation. We wanted to minimize the appearance of scratches or marks, and we are sooooo happy with this choice. It goes with all of our furniture really well.

I knew I wanted to add hardware to the cabinets. I was toying with the idea of gold handles, but I would have add to change out all of the hinges because you could see the antique brass poking through. Instead, I went with antique brass modern handles from PullsDirect.com. They were under $3 a handle verses $8 to $12 for gold. With 30 cabinets to accessorize you bet I went with the cheaper option. 

We weren't in love with the existing beige speckled countertops, but we didn't have the budget to replace them all. Instead, I found mini hexagon marble tiles that had some flecks of brown in them but also incorporated gray and white. By splurging on carrera marble we were able to elevate the kitchen without having to spend the extra amount on the countertops. 

We are so in love with our newly upgraded kitchen. It finally feels like "us." Sadly, however, a month after we renovated our kitchen flooded and destroyed our new floors and lower cabinets. Luckily we have some leftover wood and the damage isn't too bad, but it definitely is frustrating that we have to rip up the floors again. Oh well! That's life I guess. haha.

DIY THANKSGIVING CENTERPIECE

Fall is such a wonderful time of year. From the turning leaves and chilly temps, to the good food and even better company--what's not to love? Unlike other holidays (looking at you, Christmas) Thanksgiving is super easy to decorate for. All it takes is a few simple fall accents to make your home Thanksgiving ready. In fact, you can even recycle your Halloween pumpkins while doing it!

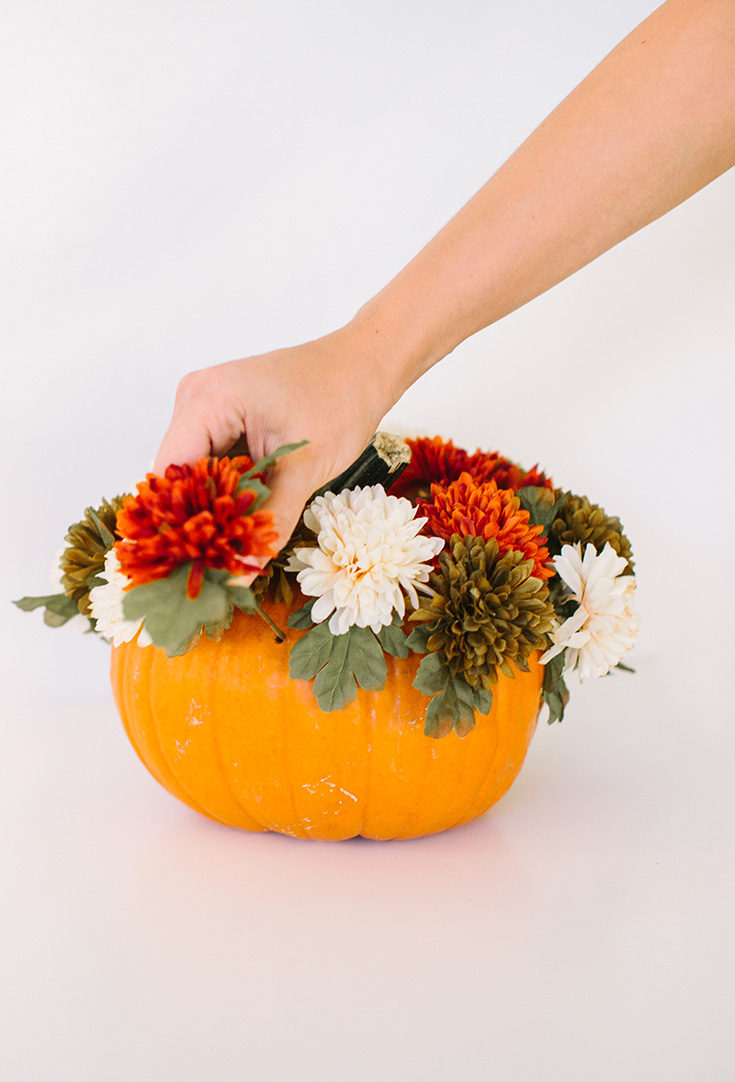
Here's how to make a gorgeous centerpiece for your Thanksgiving table using a pumpkin and some fresh mums:

ave45blog.jpg

If you have an un-carved pumpkin leftover from Halloween, now's the time to give it new life. If not, head to the supermarket or your local farmer's market and pick up a medium sized pumpkin. While you're there, look for some mums or your favorite flower in autumn tones. Cut these down so the stems are about 2-3 inches long. 

ave52blog.jpg

Next, all you'll need is a skewer or other sharp pointy object. Use this to poke holes in a ring around the stem on the upper 1/3 of the pumpkin. Doing so flower by flower will allow you to better space the flowers and ensure that you've got full coverage. Keep adding flowers until you achieve a full, luscious look.

ave55blog.jpg

How easy was that? The great thing about this arrangement is that it will last. Since the holes in the pumpkin are so small, the pumpkin will not rot with the same speed of a carved pumpkin. Make this arrangement a few weeks before Thanksgiving using fake flowers so you can enjoy it's beauty all the way up to the big day. If you want to use fresh flowers take three minutes out of your busy cooking schedule and pop the flowers into your pumpkin. SO EASY!

LAST MINUTE HALLOWEEN COSTUMES

Scrambling to throw together a costume for your friend's last minute Halloween party? Maybe you've been so focused on getting the kids' costumes together that you've completely forgotten about your own? Whatever the case, Halloween has definitely snuck up on us here at AVE Styles. While store bought costumes are simple, they never look as good as they do in the photos on the bag. Sometimes they're just plain scary. Nothing beats getting creative and crafting your own look for the evening, and we knew just where to head to do so. My assistant, Leah, and I ran to our local Savers and found a treasure trove of costumes.

While we assumed that we'd be too late and the store might be picked over, it was quite the opposite. The store had an abundance of Halloween costumes and an array of accessories very neatly organized. After a little digging, we decided on two costumes each. In fact, our choices came as no surprise because they involve two of our favorite things: social media and coffee! LOL. Here are our last minute costume ideas, featuring both new and used merchandise straight from the racks of Savers:

Pinterest: 

Of course I wanted to be Pinterest for Halloween! It only makes sense, right? This costume was a piece of cake to make. I found a plain red shift dress at Savers, printed out a big Pinterest logo, and simply hot glued it to the dress. Add a "Pin it" button and there you have it!

Snapchat:

Sticking with the social media theme, Leah decided to be Snapchat. She found the most perfect felt ghost headband at Savers along with her bright yellow dress. All she had to add was a print out of her Snapchat ghost, which is actually a QR code meaning she can walk around the party and have people add her on the app with the snap of a photo!

Starbucks Frappucino: 

I am at Starbucks on the daily. Seriously. Which means my friends will get a kick out of it when they see me dressed as this Starbucks frapp! I picked up the mocha colored dress, green sash, and white feather boa at Savers. Next I printed out the logo, glued it to the sash, and cinched in the waist of the dress. Lastly, the outfit wouldn't be complete without the notorious green Starbucks straw. For this I rolled a piece of green card stock into a tube, made two slits in the bottom, and slid a headband through. Voilà!

Emoji Unicorn: 

This last costume was actually inspired by the latest Apple iOS 9.1 update that was released this past week in which Apple added 150+ new emojis, including a unicorn! Among the other fun new emojis are a taco, champagne bottle, and some cute new furry friends. (All of these could make great costumes, too.) The unicorn was especially simple because all it really required was the accessories. The unicorn headband, rainbow tail, and pink wig were all purchased new at Savers. Leah also found a great rhinestone choker to add some bling, because unicorns obviously need bling... She dressed in all white, added a pink belt and pink lipstick, and rolled on an excessive amount of body glitter for kicks and giggles. This costume could easily be turned into a couples costume with a partner dressed as the emoji princess. How cute is that!?

If you need more ideas, Savers has put together a great inspiration board, to help spark some Halloween creativity. Happy thrifting!

This post is sponsored by Savers.